FMOD
Get started using Resonance Audio plugins for FMOD. This guide shows you how to add and configure the plugins in your FMOD Studio projects.
Set up your development environment
- Download and install the latest version of FMOD Studio.
About the Resonance Audio FMOD plugin package
The Resonance FMOD plugin package is included by default in FMOD Studio versions 1.10.02 and later.
The package has the following FMOD::DSP audio plugins.
| Plugin | Description |
|---|---|
| Resonance Audio Listener |
|
| Resonance Audio Source |
|
| Resonance Audio Soundfield |
|
Add the Resonance Audio Listener plugin to your project
The Resonance Audio Listener is required for using the Resonance Audio Source and Resonance Audio Soundfield plugins in your project.
-
Create a new empty project in FMOD Studio.
-
Open the Mixer window using ctrl + 2 (Windows) or cmd + 2 (MacOS).
-
In the Mixer window, select the Master Bus.
-
Right-click on the deck and select Add Effect > Plug-in Effects > Google > Resonance Audio Listener to place the plugin on the Master Bus.
You can also place the plugin on an event group’s Mixer deck to spatialize specific sources. See Where to place the Resonance Audio Listener for details.
-
Position the Resonance Audio Listener plugin. You can position the Resonance Audio Listener before the fader so that the fader controls the plugin output.
In rare cases where you need to bypass the fader, you can position the Resonance Audio Listener after the fader.
Plugin features
The Resonance Audio Listener plugin has the following features.
| Feature | Description |
|---|---|
| Global Gain | Controls the gain applied to all Resonance Audio sources in your project. |
| Binaural Level Meter | Indicates the output levels of your binaural mix. |
Where to place the Resonance Audio Listener
The Resonance Audio Listener plugin can be placed on any mixer. The Resonance Audio Listener mixes binaurally rendered spatialized sources with the incoming stereo input of the corresponding mixer.
Spatialize all sources
You can place the Resonance Audio Listener plugin on the Master Bus deck.
Spatialize specific sources
You can also opt to spatialize specific sources in your project.
To do this, create an event group and place the plugin on the event group’s
mixer deck.
Add a Resonance Audio Source to an event
After adding the Resonance Audio Listener to your project, you can add a Resonance Audio Source to an event.
- Right-click in the Events pane to create a new event.
- Select the event’s master track and delete the FMOD default spatializer
from the master track deck.
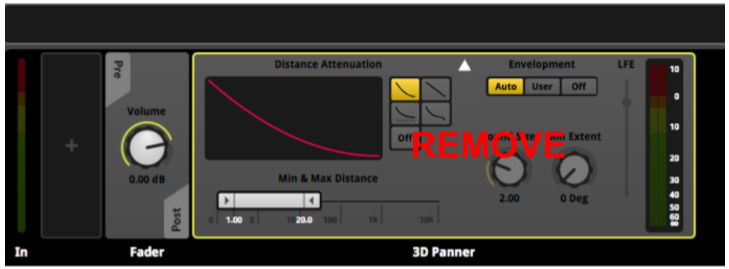
- Right-click in the master track deck.
-
Select Add Effect > Plug-in Effects > Google > Resonance Audio Source to place the plugin on the master track deck.
Typically, you place the plugin on the master track deck. See Where to place the Resonance Audio Source for details on spatializing a specific track in an event instead.
Plugin features
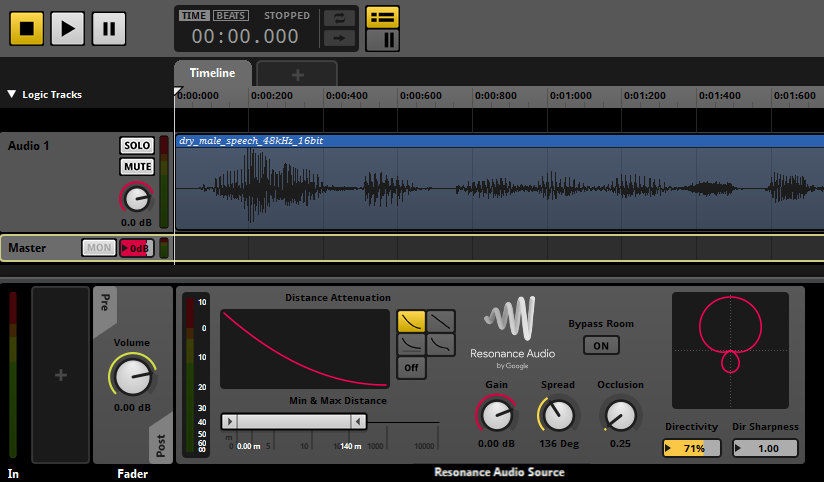
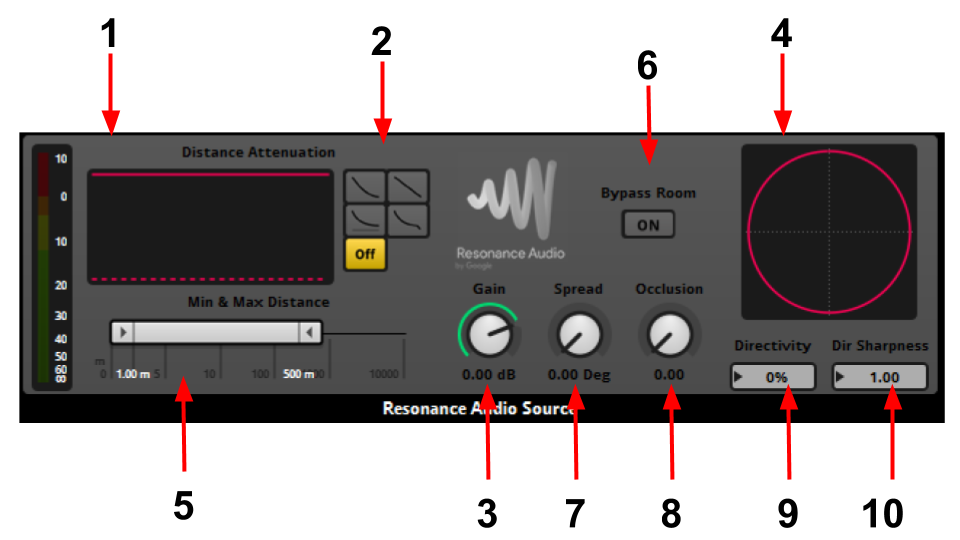
The Resonance Audio Source plugin has the following features.
| Feature | Description | |
|---|---|---|
| 1 | Distance attenuation curve | Shows a distance attenuation curve shape as a source moves towards or away from the user. |
| 2 | Curve Type Selector | Choose between a linear distance attenuation curve, a logarithmic attenuation curve, a custom distance attenuation curve, a linear squared curve, or a logarithmic tapered distance attenuation curve. |
| 3 | Gain | Gain applied to the given Resonance Audio Source. |
| 4 | Source Directivity Curve | Indicates the degree to which a source emits
sound in different directions.
|
| 5 | Minimum and Maximum Distance | Set the distances at which the source is heard at full volume (minimum distance) and at which the attenuation stops and the source reaches its minimum volume (maximum distance). The curve shown indicates a volume falloff rate with distance given these two parameters. |
| 6 | Bypass Room Effects | If you applied Resonance Audio room effects to your project, use this switch to opt out of applying room effects to a particular source. |
| 7 | Spread | Approximate width of the given Resonance Audio Source. Higher values correspond to wider, less pointed, sources. |
| 8 | Occlusion | Level of occlusion by virtual objects between the source and user. Increasing this parameter attenuates the source by removing high frequencies from it. The occlusion scale is exponential to allow the user finer control over the degree of filtering applied. |
| 9 | Directivity | As this parameter increases, the directivity curve evolves according to
the following patterns:
|
| 10 | Directivity Sharpness | As this parameter increases, the directivity curve lobe width decreases. This creates narrower emission patterns for your sound sources. |
Where to place the Resonance Audio Source
Spatialize all tracks
In most cases, you should place the Resonance Audio Source plugin in
an event’s master track deck.
Spatialize a particular track
You can also opt to spatialize a particular audio track for an
event. This directs the track’s audio into the Resonance Audio
system and away from the events master track.
To do this, place a Resonance Audio Source plugin in the deck for the audio track.
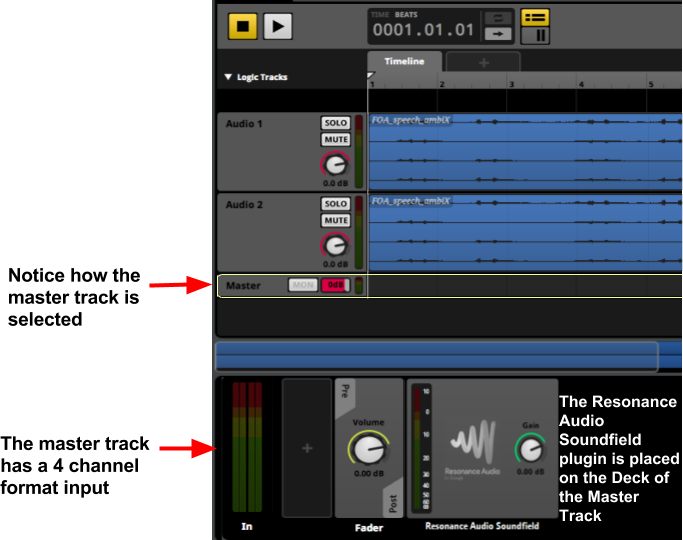
Add the Resonance Audio Soundfield plugin to an audio track
After adding the Resonance Audio Listener to your project, you can use the Resonance Audio Soundfield plugin to play first-order Ambisonic (FOA) soundfields.
The Resonance Audio Soundfield plugin supports FOA encoded in the AmbiX (ACN-SN3D) format. The same format is supported by YouTube.
-
Select the audio track(s) where you want to add your four channel FOA ambisonic soundfield audio file(s), and add the files accordingly.
-
Use one of the following options to add the Resonance Audio Soundfield plugin.
Where to add the Resonance Audio Soundfield Plugin
Using either of these methods, you can audition soundfield rotation using the 3D preview in the Overview pane.
Option 1: Place the plugin on the event master track
Using this option you can place multiple ambisonic soundfields on separate event tracks within the same event.
- Right-click in the event’s deck and select Add Effect > Plug-in Effects > Google > Resonance Audio Soundfield to place the plugin on the audio event deck.
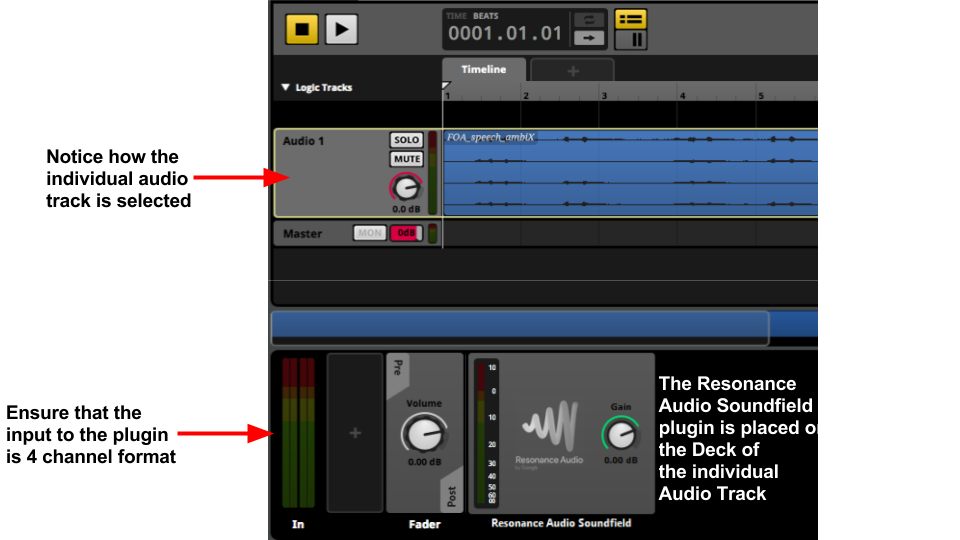
Option 2: Place the plugin and audio file on the same audio track
You can place the Resonance Audio Soundfield plugin on the same audio track as the audio file and not on the event master track.
- Right-click in the track’s deck and select Add Effect > Plug-in Effects > Google > Resonance Audio Soundfield to place the plugin on the audio track deck.
Next Steps
- See Game engine integration to learn more about using the Resonance Audio FMOD plugin in Unity and Unreal.